
Getting started…so you’ve got a brand new radio but it’s come default and you want to get on the air as soon as possible with it.
The first thing I always say to new DStar users is have you registered your callsign for DStar? Because without it you won’t be able to access the DStar network. Depending on when you register and with who it can take a few hours to a few days. This site is for UK users of DStar (if you are from outside of the UK and wish to add valid information for your country please do so in the comments below).
The key is you only need to register ONCE!! There seems to be little in the way of solid info on how to register your callsign.
If you’re in the UK then you are in luck – if you contact Icom UK directly they will register your callsign for you. Here’s how to get in touch with them: https://icomuk.co.uk/News_Article/2/1052/
If you’re in the US or elsewhere you need to register with a repeater local to yourself.
If you want to check your callsign registration details you can do so here: https://www.pistar.uk/d-star_regcheck.php
DStar Terminology
So if you are new to DStar there is a bit of terminology you are going to hear people talk about – it can be a bit daunting at first but once you have it understood it all makes sense.
If you think of DStar as a routing protocol rather than the name of a Digital Voice (DV) mode it becomes clearer.
Below is a list of the various terminology that you will come across:
- To Field – In DStar the “To” field is used to tell the DStar network where you want to send your voice to – eg the destination.
- Within the To field there are a number of additional options:
- Local CQ – this is essentially the same as an analogue repeater in that your voice will only be heard on the RF output of the local repeater and will not pass over the internet/ DStar routing to any other repeaters or hotspots. To use Local CQ you simply have to select it so it appears in the To field on your radio.
- Gateway CQ – this mode is used if you want to route your voice from the repeater you are using to a specific repeater – eg: You talk in on GB7RA but want to talk out on GB7WP. To use Gateway CQ you have to, dependant on if you have a DR enabled or older style radio, either select the repeater from the list or enter the repeater name – eg: GB7WP___B
- Reflector – Think of a reflector as a chat room. It enables multiple DStar users to talk – a reflector is basically a server which handles DStar QSOs.
- Within the To field there are a number of additional options:
- From Field – as above with the To field – the From field simply is the repeater (or hotspot) that you will use to connect to DStar – eg: GB7RA___B
- Those with keen eyes will have seen above that I have used naming of repeaters such as GB7RA___B. The ___ indicates a space the B indicates the type.
- When DStar was first setup there were 3 voice bands defined:
- A – being 23cm
- B – being 70cm
- C – being 2m
- It’s most common to come across B & C band repeaters – although Icom UK do run an A band one in the UK on 23cm in Hearne Bay – GB7IC.
- There are other suffixes too but you tend to only find these in the reflector world. A good example of this would be REF079D which is the North West UK reflector and links together GB7RA, GB7DV, GB7WC & sometimes further.
- When DStar was first setup there were 3 voice bands defined:
- Reflectors
- Going back to the “To” field above – one of the options is reflectors. Simply think of a reflector as a chat room that is internationally available.
- There are multiple types of reflector:
- REF – this is the original Icom type reflector – they are limited to only DStar users and do not support any cross mode QSOs – so with the REF type you will only ever speak to other DStar users. Popular REF reflectors are REF001C (the primary international reflector, REF079D (NWUK Reflector) & REF030C (A USA wide reflector).
- XRF – this stands for XReflector – these types of reflectors support extended feature such as cross mode operation whereby users of DStar radios can have QSOs with users of other modes such as DMR & Yaesu Fusion. One popular example of this would be XRF757A which is the home of the Quadnet array.
- DCS – These types of reflectors originated in Germany and were primarily used by German hams – more recently they have been adopted by a wider group and are like XRF in that they support an extended feature set that supports cross-mode operation. An excellent example of this would be DCS477B for Hubnet in the UK which links DStar, DMR, Yaesu Fusion and FM !!
- XLX – these are the newest type of reflector and support all the above protocols. More on XLX to follow.
Programming Your Radio – Icom ID51
So like a recipe once you’ve registered your callsign you’re going to need the following:
- Icom 51 radio (E or A version)
- An (upto 16gb) MicroSD card for the radio (Sandisk or Samsung reported to work)
- Access to a local DStar repeater or DV Hotspot
So assuming you have all the components above you need to download the latest repeater lists for the radio. To do this head over to http://dstarinfo.com there you’ll select “Downloads” then “Repeater List downloads for DR radios”
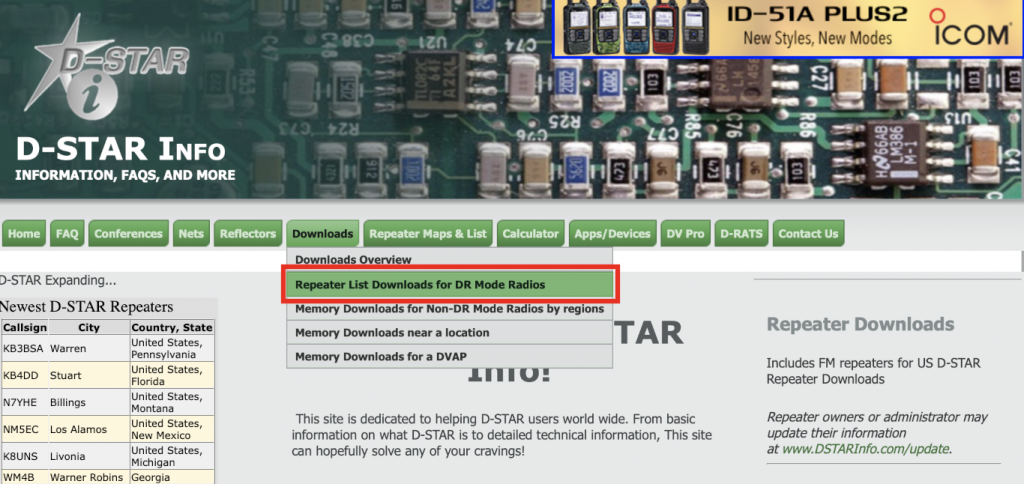
From here you’ll need to:
- Type your location (just pick a major UK city)
- Select your radio model – so if you have a newer Plus or Plus 2 model you need to be specific about the type as the memory capacity can vary.
- Select “Download”
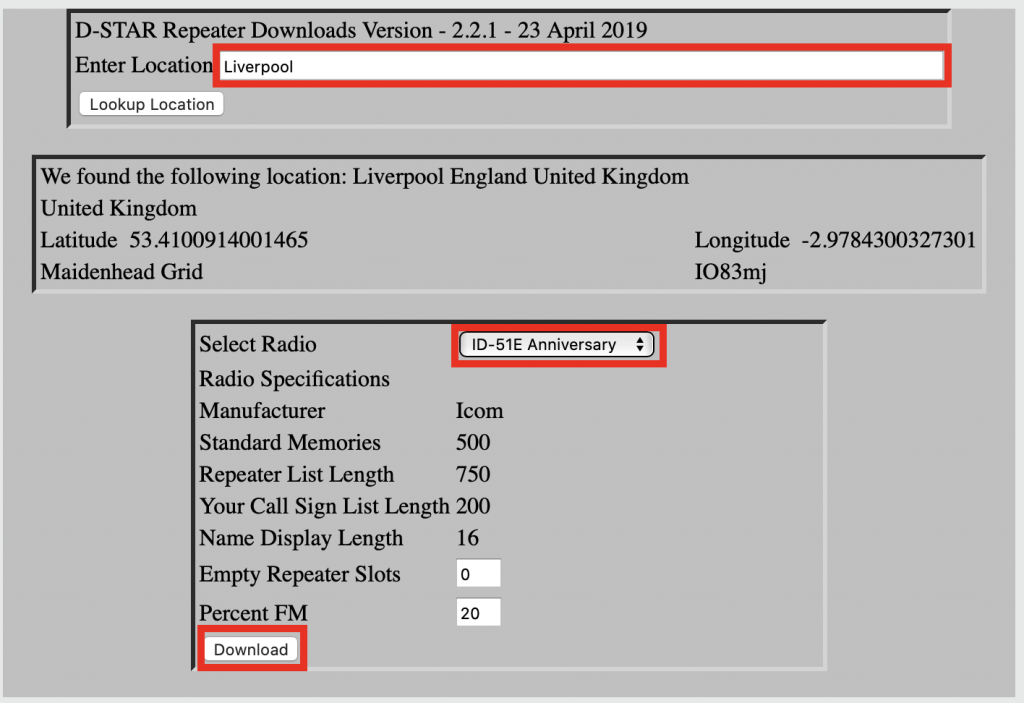
The file will save as a .CSV file onto your computer, you’ll need to copy (not move) this file to your SD card. But first we’ll need to format the SD card using the radio. The reason we format in the radio is that once the format is complete the radio will install a default set of folders onto the SD card.
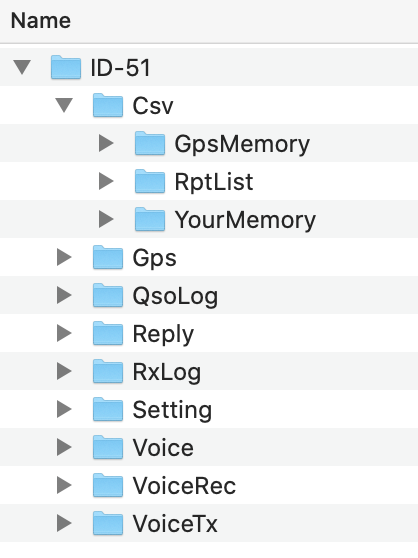
Above is the default folder structure for the ID51 – I’ve expanded the “Csv” folder to show it’s sub-folders. You’ll copy the downloaded CSV file into the “RptList” folder.
More to follow as I update the site.